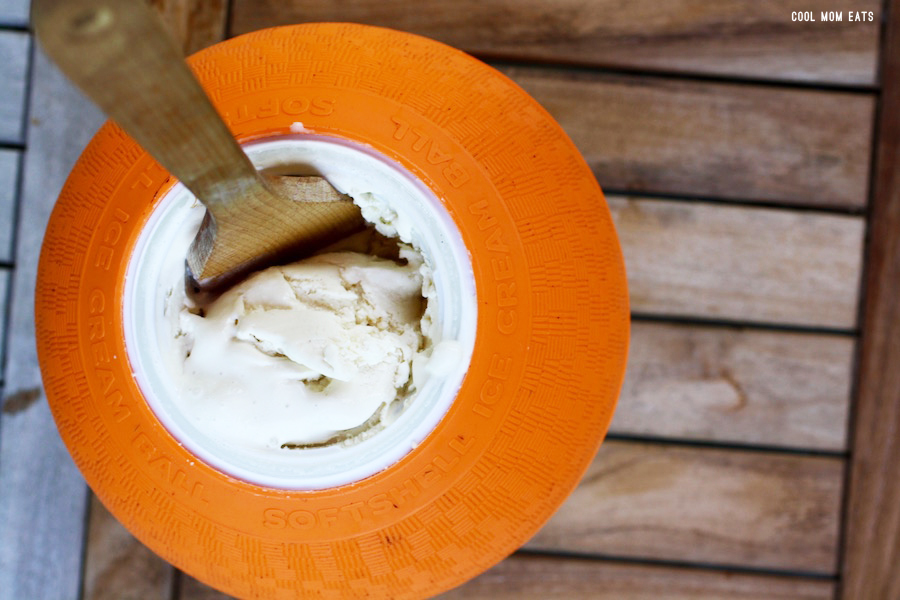
At a recent barbecue, my neighbor introduced me to one of the coolest — and tastiest — kid activities I’ve seen in a long time. Using the YayLabs Ice Cream Ball, a group of kids churned a simple recipe into creamy ice cream with about thirty minutes of play.
Besides some help with the scooping, the entire project was led by my [admittedly awesome and mature] 11-year-old neighbor. She got all the kids engaged in rolling, shaking, and even kicking the ball. The anticipation was almost more exciting than the ice cream itself.
Almost.
CME is an Amazon and rStyle affiliate.
Related: An outrageous — and EASY — recipe for frozen chocolate-covered bananas.
As with most homemade ice cream recipes, there are a few things you should know to ensure success. Check out my pro tips below, but keep in mind that the kids really did manage most of the process. Well, except for eating part, which required a little adult oversight. You know, to make sure that we got a taste too!
And really do check this toy/ice cream maker out. It was fantastic. A must-have item if you ask me, even at this point in the summer.

What you’ll need:
• Yaylabs Softshell Ice Cream Ball: This is not a sponsored post, and there are definitely other models out there, but I love the simplicity, BPA-free materials, and bright colors of this Yaylabs ball. Plus, it’s the only one I’ve tried and it works well, so I’m sticking with it.
• Ice: Just the regular kind from your freezer.
• Rock salt: We found some at Target.
• Wooden spoon: Don’t use metal!
• Ice cream ingredients: Cream, sugar, and vanilla (or other flavorings).
• Kids: Should be easy to come by, especially since you’re offering outdoor play and ice cream. But only children you know, please. Heh.

How to make the ice cream:
Of course, the Yaylabs Softshell Ice Cream Ball comes with directions and a recipe, but I want to give you the basic run down here so that you can see how easy this really is.
• Combine the ingredients for your ice cream recipe (included with the ball) in a bowl.
• Add the ice and rock salt to the compartment in one end of the ball.
• Add the ice cream ingredients to the compartment in the other end.
• Set the ball in motion! Roll it, kick it, toss it, and shake it.
• Check the ice after about 15 minutes and add more if needed. Give the ice cream a mix.
• Play for another 15 minutes.
• Flip back the handle and scoop out your ice cream!
Related: An easy DIY ice cream cake using the most amazing store-bought hack.

Some more pro-tips:
• I recommend keeping this as an outdoor activity; have a few towels around in case the ball leaks a little and also for scooping, which definitely gets a little messy.
• We used a couple of quart size balls, which worked great for our bigger group.
• Make sure the lids are closed completely after checking the ice cream and adding more ice.
• Remember that the consistency of your ice cream will depend on how much you shake the ball (you really want to move it), whether you use real cream (you should), and how much ice you use (the colder the better).