Instant Pot mania has not died down and, if you ask us at Cool Mom HQ, it’s with good reason. Many of us are Instant Pot devotees and, though we each tend to use it differently, we’re all pretty much in love with the pressure cooker/slow cooker appliance.
If you’re not sure whether or not an Instant Pot is right for you, start with our post What is an Instant Pot and do you need one? If you already have one and are still learning the ropes, or you’re planning on buying one and want to prepare for your new kitchen toy to arrive, here’s a quick guide to the buttons on your Instant Pot.
Related: 10 dinner party-worthy dinner recipes you can make in a slow cooker or Instant Pot.
Yes, all of this stuff is in the manual and we suggest that you read it. And no, this does not cover everything that your Instant Pot can do, but it does give a good overview on how to use an Instant Pot and, if you’re anything like me, you’ll need that. Because trust me: The manual will be much more comprehensible after reading this.
At the very least, this quick guide will keep you from getting frustrated and giving up on your IP like I almost did, and I promise it’s worth figuring out.
A couple of quick notes before we start: Keep in mind that there are slight differences between models, though all the buttons function the same. Also, I bought my Instant Pot under the assumption that the specialized buttons like chili and chicken would work to cook any chili or chicken recipes, but that’s not exactly the case.
Pressure cook time for any dish will vary depending on the amount of food and liquid in the IP. So, while the chili button will cook certain amounts of chili just right, it may not cook that double batch as well without making a few manual adjustments. So basically, think of these buttons as shortcuts to commonly used pressure level/cooking time combinations.
Make sense? If not, leave a question below. In the meantime, to the buttons we go…
Related: What is an Instant Pot and do you need one? (We think yes.)
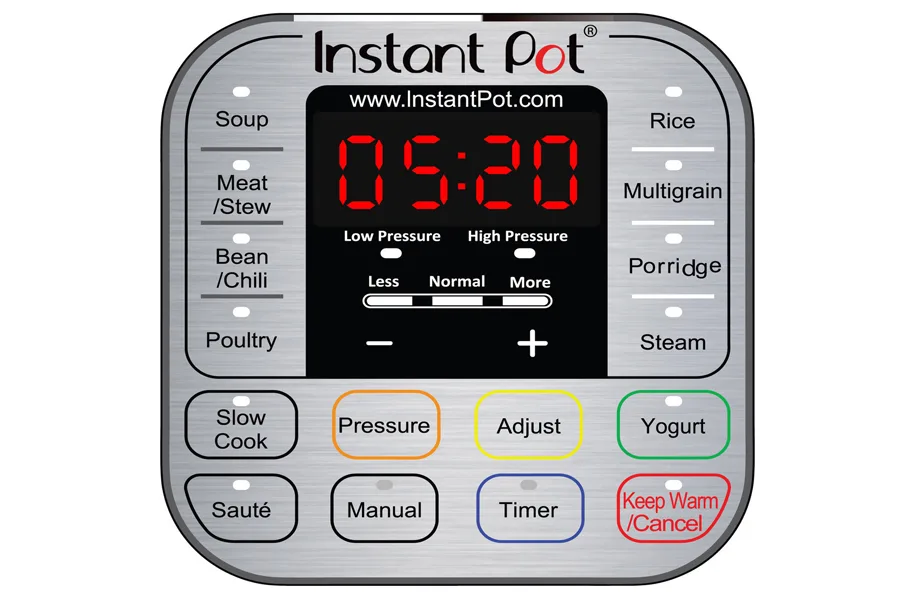
* SAUTE: This allows you to do just that: sauté and brown food. When you use this button, you’ll be cooking with the lid off. Hit it to start and, on my Smart-60 model, you’ll get a 30-minute max cook time that can be cancelled any time by hitting keep warm/cancel. Adjust how hot the sauté pan gets by hitting normal, more, or less. Normal is for regular browning, more is for stir-frying, and less is good for simmering or — really good to know — thickening sauces. Like when, for example, you’re done cooking that stew, release the steam, remove the lid, and want to simmer your dish for another 20 minutes to cook the sauce down.
* MANUAL: Unless you’re sure that one of the shortcut buttons has the right pressure/timing combo your recipe needs (see below), this is your main button. From here, you manually set the pressure and cook time, using the +/- buttons to adjust up or down.
* TIMER: This is for delayed cooking, which is super helpful to us busy parents. If your recipe only needs to cook for 30 minutes in the IP and you’re putting the ingredients in the pot at 8 am, before leaving the house for the day, you’ll want to delay when your pot begins cooking. (Keep in mind that you cannot use this button when using the yogurt or sauté functions.) Set your cooking pressure and time as your normally would, then, if you want to delay the start time, hit this button within 10 seconds using the +/- buttons to adjust the number of delayed hours.
* KEEP WARM/CANCEL: This cancels any function and turns off your IP. Also note that when your IP is done cooking, it will automatically kick into keep warm mode and stay there for a maximum of 10 hours, after which it will turn off. At any point, you can hit this button to cancel keep warm mode, release the steam if there is still some built up, and open the lid.
* SLOW COOK: This magically turns your IP into a slow cooker. So, yea, if you have one of those still, time to consolidate.
* PRESSURE: Whenever you are cooking in manual mode, this is the button you’ll use to adjust your pressure: high, medium, or low. Or, if you decide to use a shortcut button (e.g., chili) and like the timing it auto-sets, but want to adjust the pressure level, use this button to do that.
* YOGURT: Yup, you can make yogurt in an Instant Pot. Check your manual for details.
* SOUP: Auto-sets the pot to high pressure for 30 minutes. You can use the adjust button to select a shorter or longer cook time, but you can’t adjust the pressure since the IP uses sensors to make sure that the soup or broth never hits a boiling state.
* MEAT/STEW: Auto-sets the pot to high pressure for 35 minutes.
* BEAN/CHILI: Auto-sets the pot to high pressure for 30 minutes.
* POULTRY: Auto-sets the pot to high pressure for 15 minutes.
* RICE: This is the only fully automatic shortcut button. It cooks on low pressure for as long as it needs to based on the amount of liquid it senses in the pot. It is for cooking “regular” rice, according to the manual (white rices?), and takes about 12 minutes to cook 2 cups of rice, 14 minutes to cook 3-5 cups of rice. Note that cooking time will not display while rice is cooking.
Some people prefer to cook their rice using high pressure, in which case you’ll need to use manual mode to set your preferred pressure and cook time.
* MULTI-GRAIN: Auto-sets the pot to high pressure for 40 minutes.
* PORRIDGE: Auto-sets the pot to high pressure for 20 minutes.
* STEAM: Auto-sets the pot to high pressure for 10 minutes. It’s important to use the steamer basket or trivet for this setting. Also, a natural steam release — where you let the steam subside on its own over time by allowing the IP to sit untouched for minutes after it’s done cooking — will likely cause overcooking in this mode. Instead, make a habit of using quick release when steaming. You can even steam easy-peel hard boiled eggs using this setting!


One response to “A quick guide to the buttons on your Instant Pot. (Because you have one, right?!)”
you might want to check out this chart which shows that the buttons on the IP are not just presets but actually heat the pot up in different ways. https://instantpot.com/technology/smart-cooking-programs/
This will change the way you think of the ‘smart’ buttons and using them changes the way your food comes out (for the best).